
Blocky Planet is a tech demo I created in the Unity game engine that attempts to map Minecraft’s cubic voxels onto a spherical planet. The planet is procedurally generated and fully destructible, allowing players to place or remove more than 20 different block types.
While much of the implementation relies on common techniques you’d expect from your average Kirkland brand Minecraft clone, the spherical structure introduces a number of unique design considerations. This post will focus on these more novel challenges.
FAQ
How can I play it?
The latest build is available for free on my Itch.io page here. While it’s optimized to run natively for Windows, there is a playable web build available to run in the browser (some jankiness may apply).
Why did you make this?
I was inspired by an old tech demo by Jordan Peck that I happened to stumble across. As someone who loves procedural geometry and voxel games, recreating it seemed like a fun challenge. There were also some missing features that I hoped to implement in my version (block textures, large-scale destruction, etc.).
Are you going to make this into a full game?
Probably not, or at least not to a level of polish I would feel comfortable charging for. Unfortunately working full time doesn’t leave much room for these side projects, and the amount of work to go from tech demo to finished product can be monumental. Though there’s a good chance I’ll push an update from time to time.
How long did it take to make?
It took me a little over a month to code, during which time I was able to dedicate about 15 hours per week. I did have previous experience with voxels, so the main challenge was just making it spherical. Ironically, it took over twice as long to write/illustrate this blog post.
What did you use to make it?
I built the project with Unity 6 using C#. While I made heavy use of Unity’s Job system and Burst compiler, I didn’t opt to go all in on DOTS. From my (admittedly limited) understanding, it seems like a significant amount of effort for a small-to-moderate performance gain, while still lacking in some basic features.
Can I see the source code?
Not currently, but I may make it public later. The current state of the code isn’t the cleanest, so my sense of pride prevents me from sharing it.
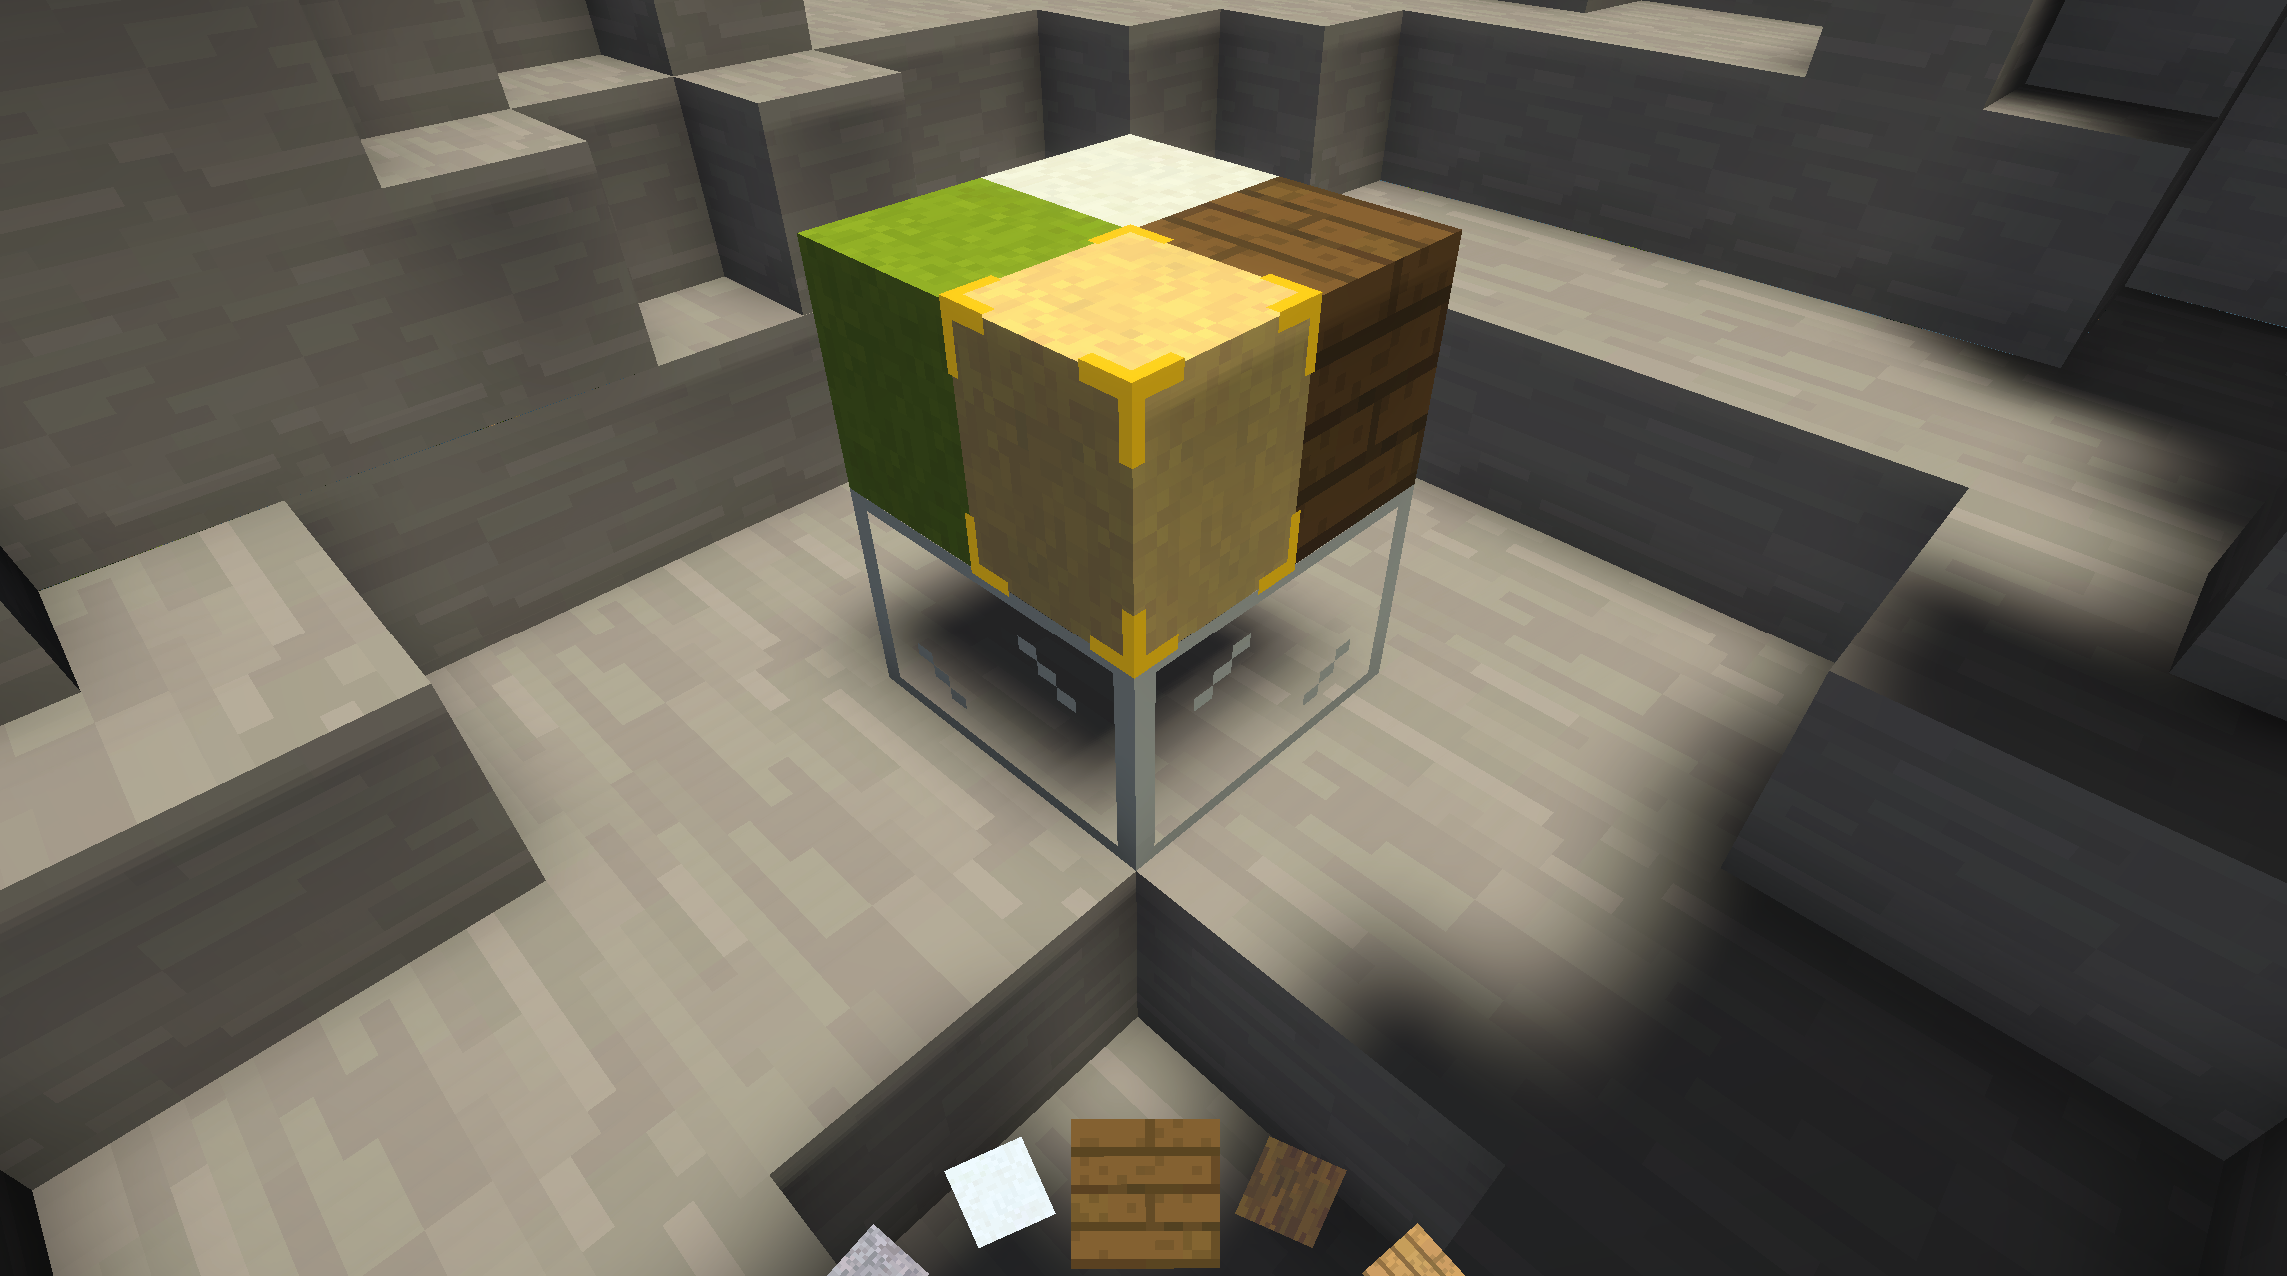
Which texture pack did you use for the blocks?
All textures were painstakingly crafted by yours truly, either using a pixel art editor or programmatically via scripts. On an unrelated note, a surprising amount of Minecraft textures can be approximated by color-tinting random noise.
I have a cool idea or question for you. Where should I ask it?
Great! Please leave any questions or feedback on the corresponding reddit post here.
If a suggestion is reasonable I might just add it (no promises though).
Let’s Get Spherical
Building a sphere out of blocks — while tricky to do by hand — is trivial with code. You can just filter for blocks whose centers lie within some distance from a central point, and voilà: a blocky sphere!
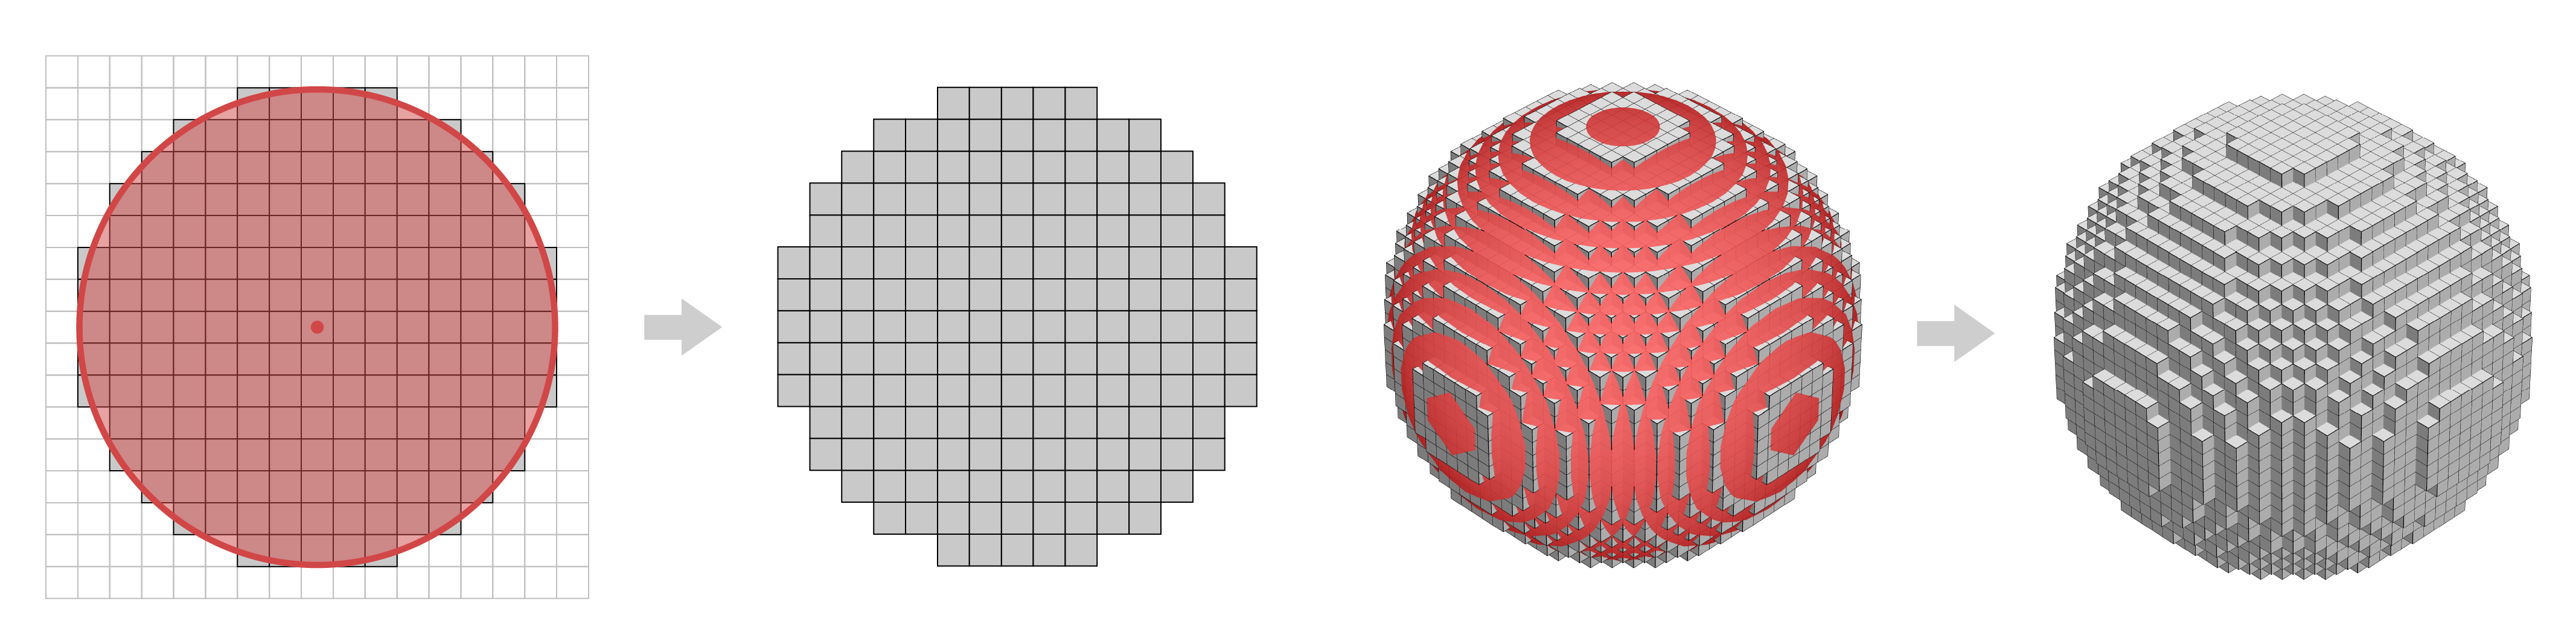
Left: 2D blocks (squares) selected if their center lies within the red disk.
Right: 3D blocks (cubes) selected if their center lies within the red ball.
This works great for architecture, but makes for a rather lackluster planet. The issue is that the surface of our blocky sphere does not align with the direction of gravity. This causes problems when trying to build “upward” on the planet or walk along its surface.

Left: 2D representation of planet constructed from grid-aligned blocks.
Right: Planet with gravity-aligned blocks.
So what we want instead is a way to arrange our blocks such that their vertical faces always align with the direction of gravity (top face points towards space, bottom face points towards planet center).
There are two (2) parts to this problem:
- Mapping a 2D square grid onto a 3D sphere
- Preserving block width as you move outward
Like most things in life, these problems don’t have a single “right” answer — only a bunch of potential solutions with tradeoffs. Let’s take a look at the solutions I settled on.
Cartographer’s Bane
Thanks to Gauss, we know that mapping a flat grid to a sphere is impossible without some distortion. This problem has plagued cartographers for centuries, and in their madness drove them to invent dozens of map projections, each one wrong in its own special way.
Many of these projections attempt to map the entire globe to a single rectangle. This results in an unfortunate artifact where the entire top of the rectangle represents the same point on the sphere, leading to rather extreme distortion.
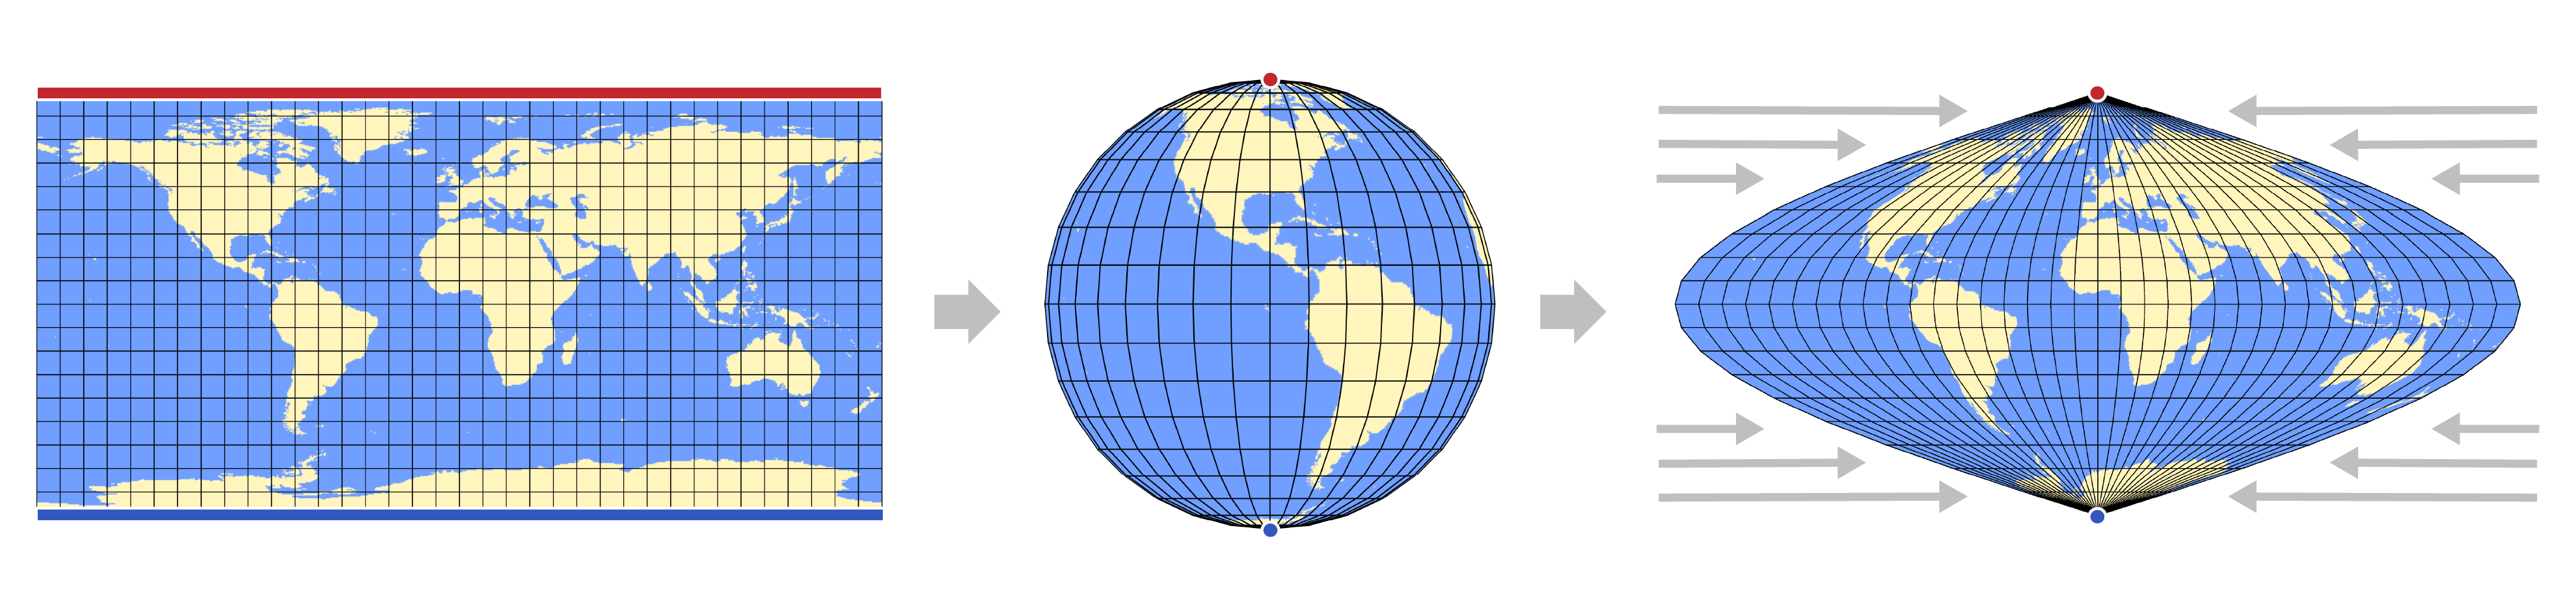
To avoid this, many game developers use something called a quad sphere. Instead of mapping a single rectangle to the entire globe, quad spheres divide it into six (6) equivalent sectors, one for each face of a cube. Then a separate square can be mapped to each sector, resulting in much less distortion overall.
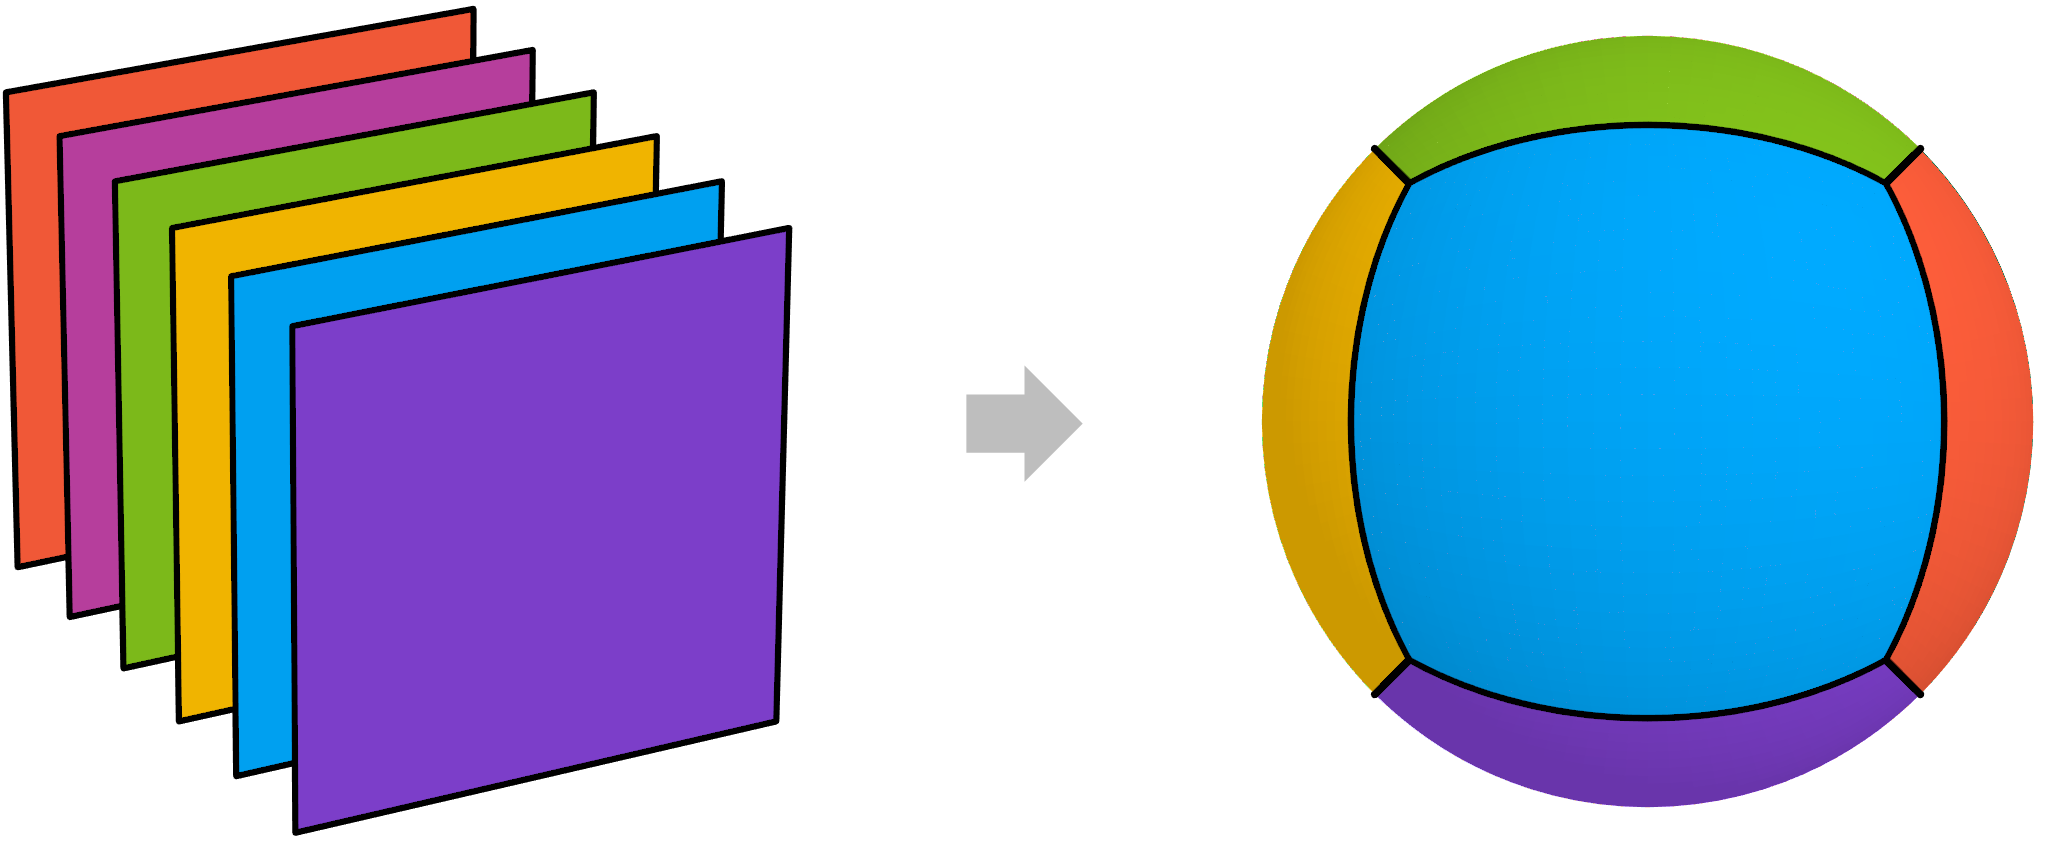
The recipe to construct a quad sphere is fairly straightforward:
- Start with a cube centered at the origin
- Subdivide each face into a square grid
- Push each vertex (corner in the grid) outward until it is exactly one (1) unit distance from the origin
Step 3 is done by normalizing each vertex point, which is equivalent to projecting it onto the unit sphere. Visually, I like to think of this as inflating the cube like you would a balloon.

Due to mapping distortion, the projected squares are, well, no longer squares. So instead we refer to them by the more general term quads (hence the name quad sphere).
While some distortion is unavoidable, the default quad sphere has far too much for my liking. Luckily, there are some ways to reduce how much our poor quads get squished and stretched. I initially included the full explanation here, but out of respect for your time I decided to move it to a separate post (still a WIP). The gist is we want to pre-distort our square grid to counteract the distortion introduced during normalization. The outcome is quads that do a much better job of preserving the area, angles, and side lengths of the original squares.


To convey the importance of reducing quad distortion in practice, let’s take a look at how blocks in the same location along the border of two (2) sectors differ between mappings.


The blocks with the default mapping are clearly squeezed into rectangles, while with the improved mapping they look much more like squares. This is even more noticeable when actually playing the game.
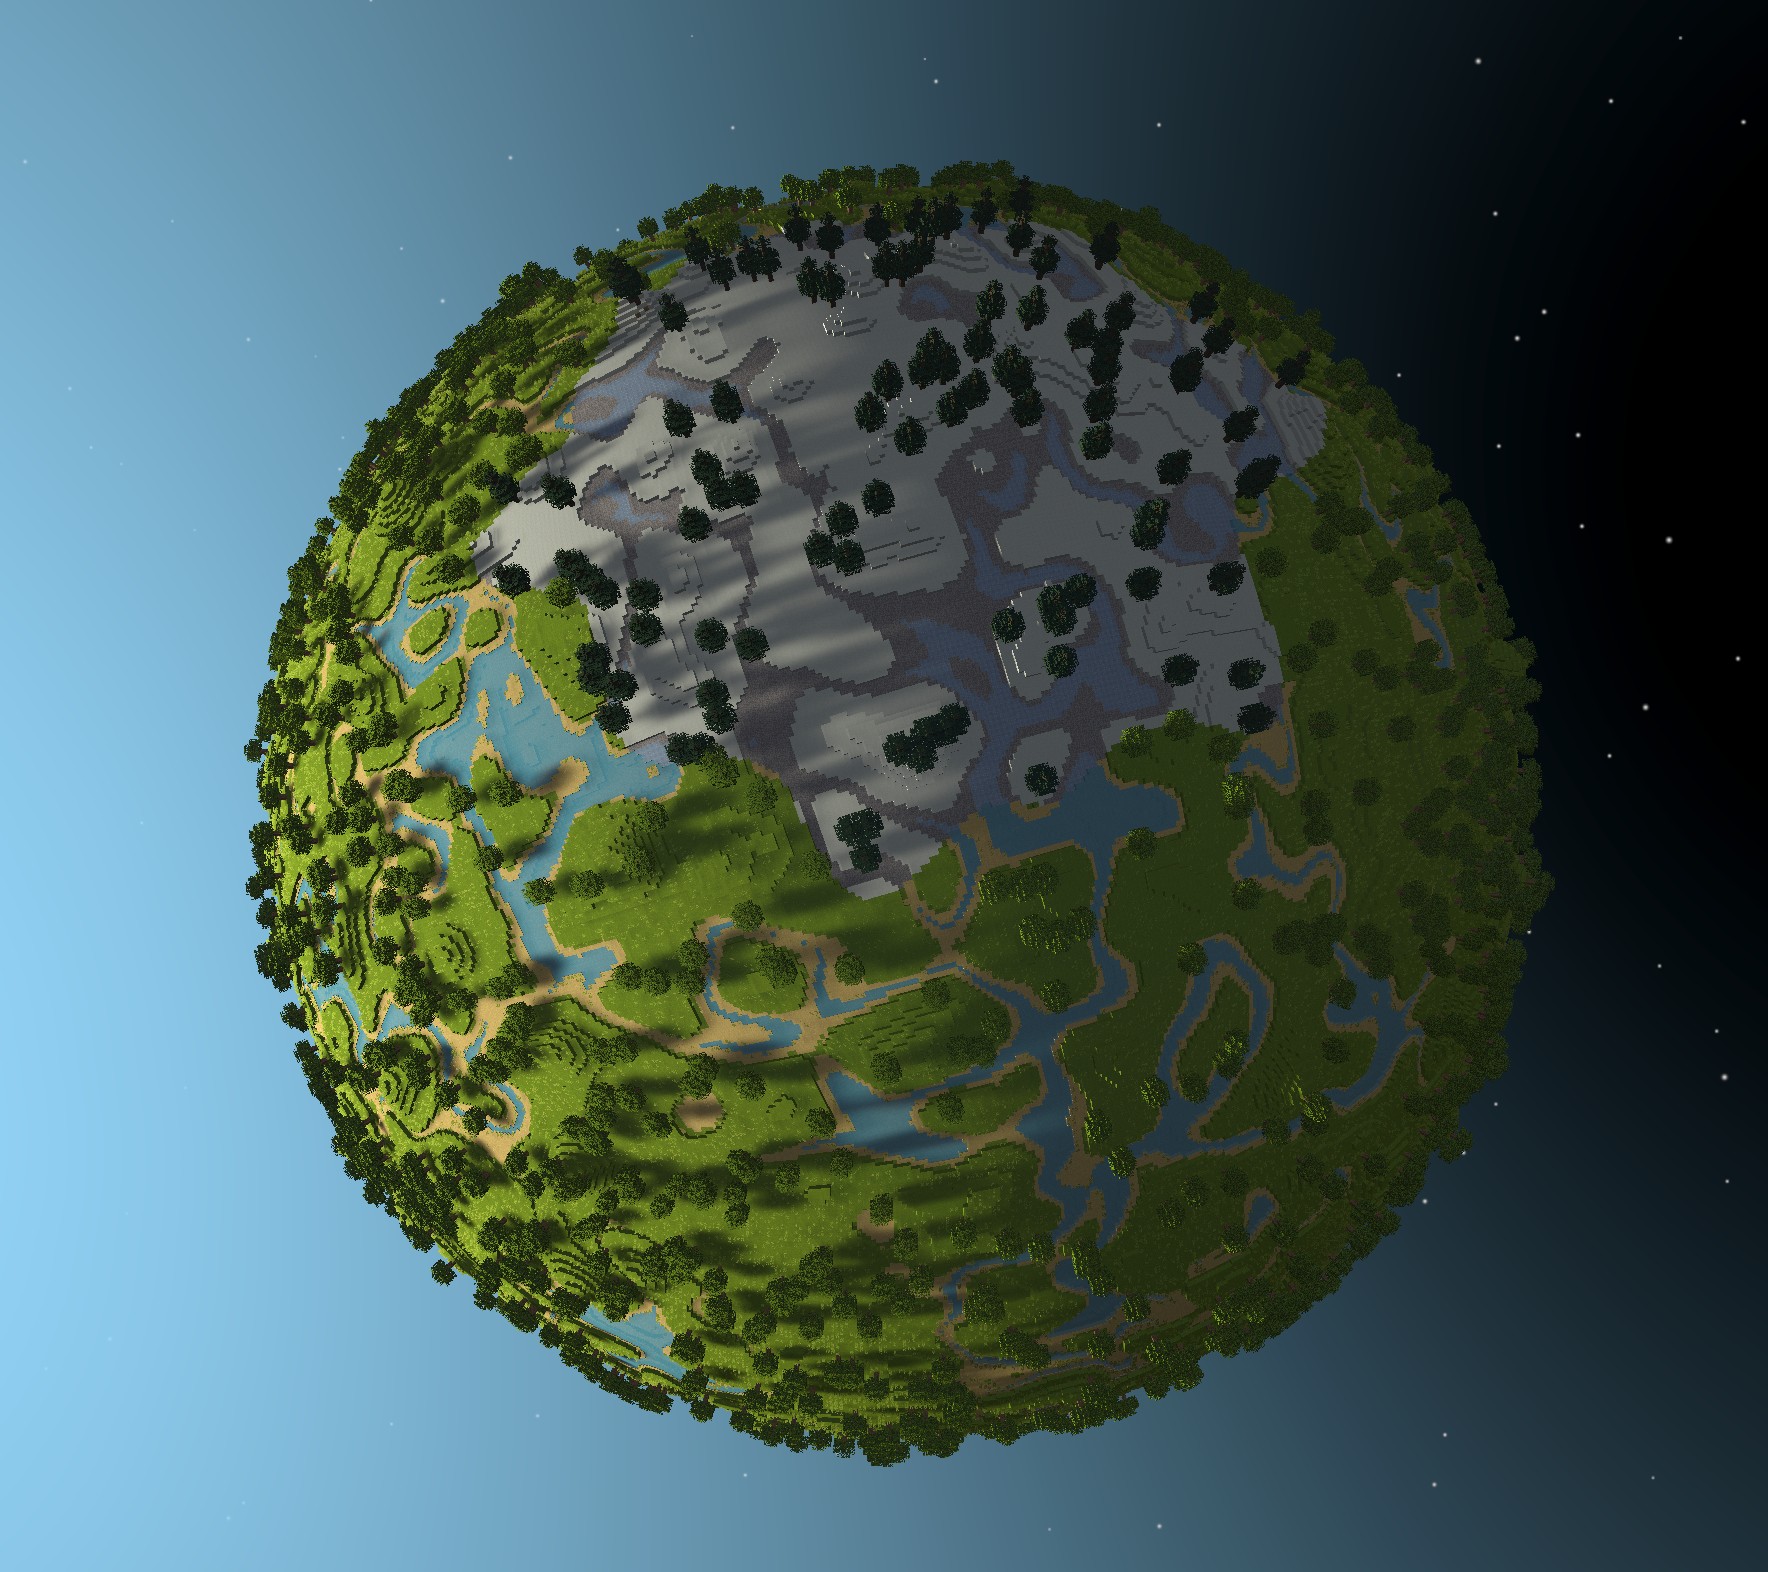
And just for fun — let’s look at a small blocky planet before and after applying any spherical projection.


Technically the pre-projection version is fully playable. Though it feels like you’re constantly walking on a slope since gravity still pushes you towards the planet center.
Digging Deep
Now that we have a fairly nice surface mapping, we need to handle the distortion that comes with depth.
Depth in a flat blocky world is simple — you can just keep stacking identical layers on top of one another without issue. However, on a spherical blocky world this will lead to thin blocks near the the planet’s center and wide blocks near the surface (assuming constant block height, which we want).

The way to minimize this distortion is to add more blocks to each layer as you move outward from the center. We could technically calculate the ideal number of blocks for each layer and use that, but this would cause the edges of blocks to not align properly — making for unsatisfying walls and pillars.

A compromise is to only add more blocks to a layer when the block distortion becomes too great. In addition, to ensure that the seams of the previous layer align with those of the next layer, we need to increase the number of blocks by some integer multiple. We could use any integer ≥ 2, though using the smallest value of 2 will lead to the least distortion.
This results in our block layers being grouped into shells, where within each shell all the block sides will align nicely. But as we move outward, each shell quadruples (2^2) the number of blocks per layer to keep their size roughly consistent. This does mean that the blocks at the bottom of a shell will be a quarter of the size of the blocks at the top, but I consider that a fair compromise for edge alignment. It also has the added benefit of organizing the blocks of each shell into a regular grid, which will make the code much cleaner and more efficient.

Yes, an alternative approach is to limit the player to a single shell, essentially enforcing a minimum and maximum build height. This is reasonable for large planets, since the shells get exponentially bigger as you move away from the planet origin. You can even reduce the amount of visible distortion by restricting players to a portion of a shell, so they never see the full difference in block size at its top and bottom.
From what I can tell, this seems to be the approach used by the upcoming game PlanetSmith for its hexagonal-blocky planets.
I opted to use the multi-shell approach for Blocky Planet, both because I want to support tiny planets and because I find the ability to dig all the way to the planet’s center to be particularly satisfying.
Planet Structure
Now that we’ve addressed the various distortions, let’s focus on how the planet is represented in practice.
In a flat blocky world, the structure for storing blocks is fairly simple. You have the world divided into column chunks, which span from the minimum to maximum build heights. Each column chunk is then subdivided vertically into render chunks. For instance, Minecraft uses column chunks of size 16x320x16 blocks, which get divided into render chunks of size 16x16x16 blocks.

In contrast, the spherical world is divided into six (6) wedge-like sectors, one for each axis direction. This comes from our choice to represent the planet surface with a quad sphere.
Each sector is then subdivided “vertically” into shells. As you move alway from the planet origin, these shells get larger both in terms of the number of layers, as well as the number of blocks per layer. There is no restriction on the number of shells, meaning this structure can “cover” all of 3D space (for now I do set a max build height, but that’s not a limit of the planet structure itself).
For efficiency, I further separate these variable-sized shells into regularly sized chunks with dimension 16x16x16 blocks.
Computers generally perform better when batching work rather than doing tasks separately. This is especially true in the case of simulating physics and rendering objects.
This is why almost all voxel games group voxels into chunks that can be batch-processed whenever one or more voxels are modified. These chunks tend to have a consistent size so they can be processed identically.
Blocky Planet is no exception, which is why I further subdivide each shell into multiple chunks, where each chunk is the same size regardless of the shell it falls in. With this setup, all of the computations that run on chunks can be (mostly) agnostic to where the chunk is on the planet.
One drawback to having a constant size for all chunks is that certain shells near the planet’s center will be too small to be represented with a chunk. For now I simply don’t allow blocks to exist in these lower shells (creating a hollow core), but I would like to address this in the future.

To give you an idea of how this looks in-game, here are two (2) screenshots of from early versions of Blocky Planet that show an exploded view of the world.
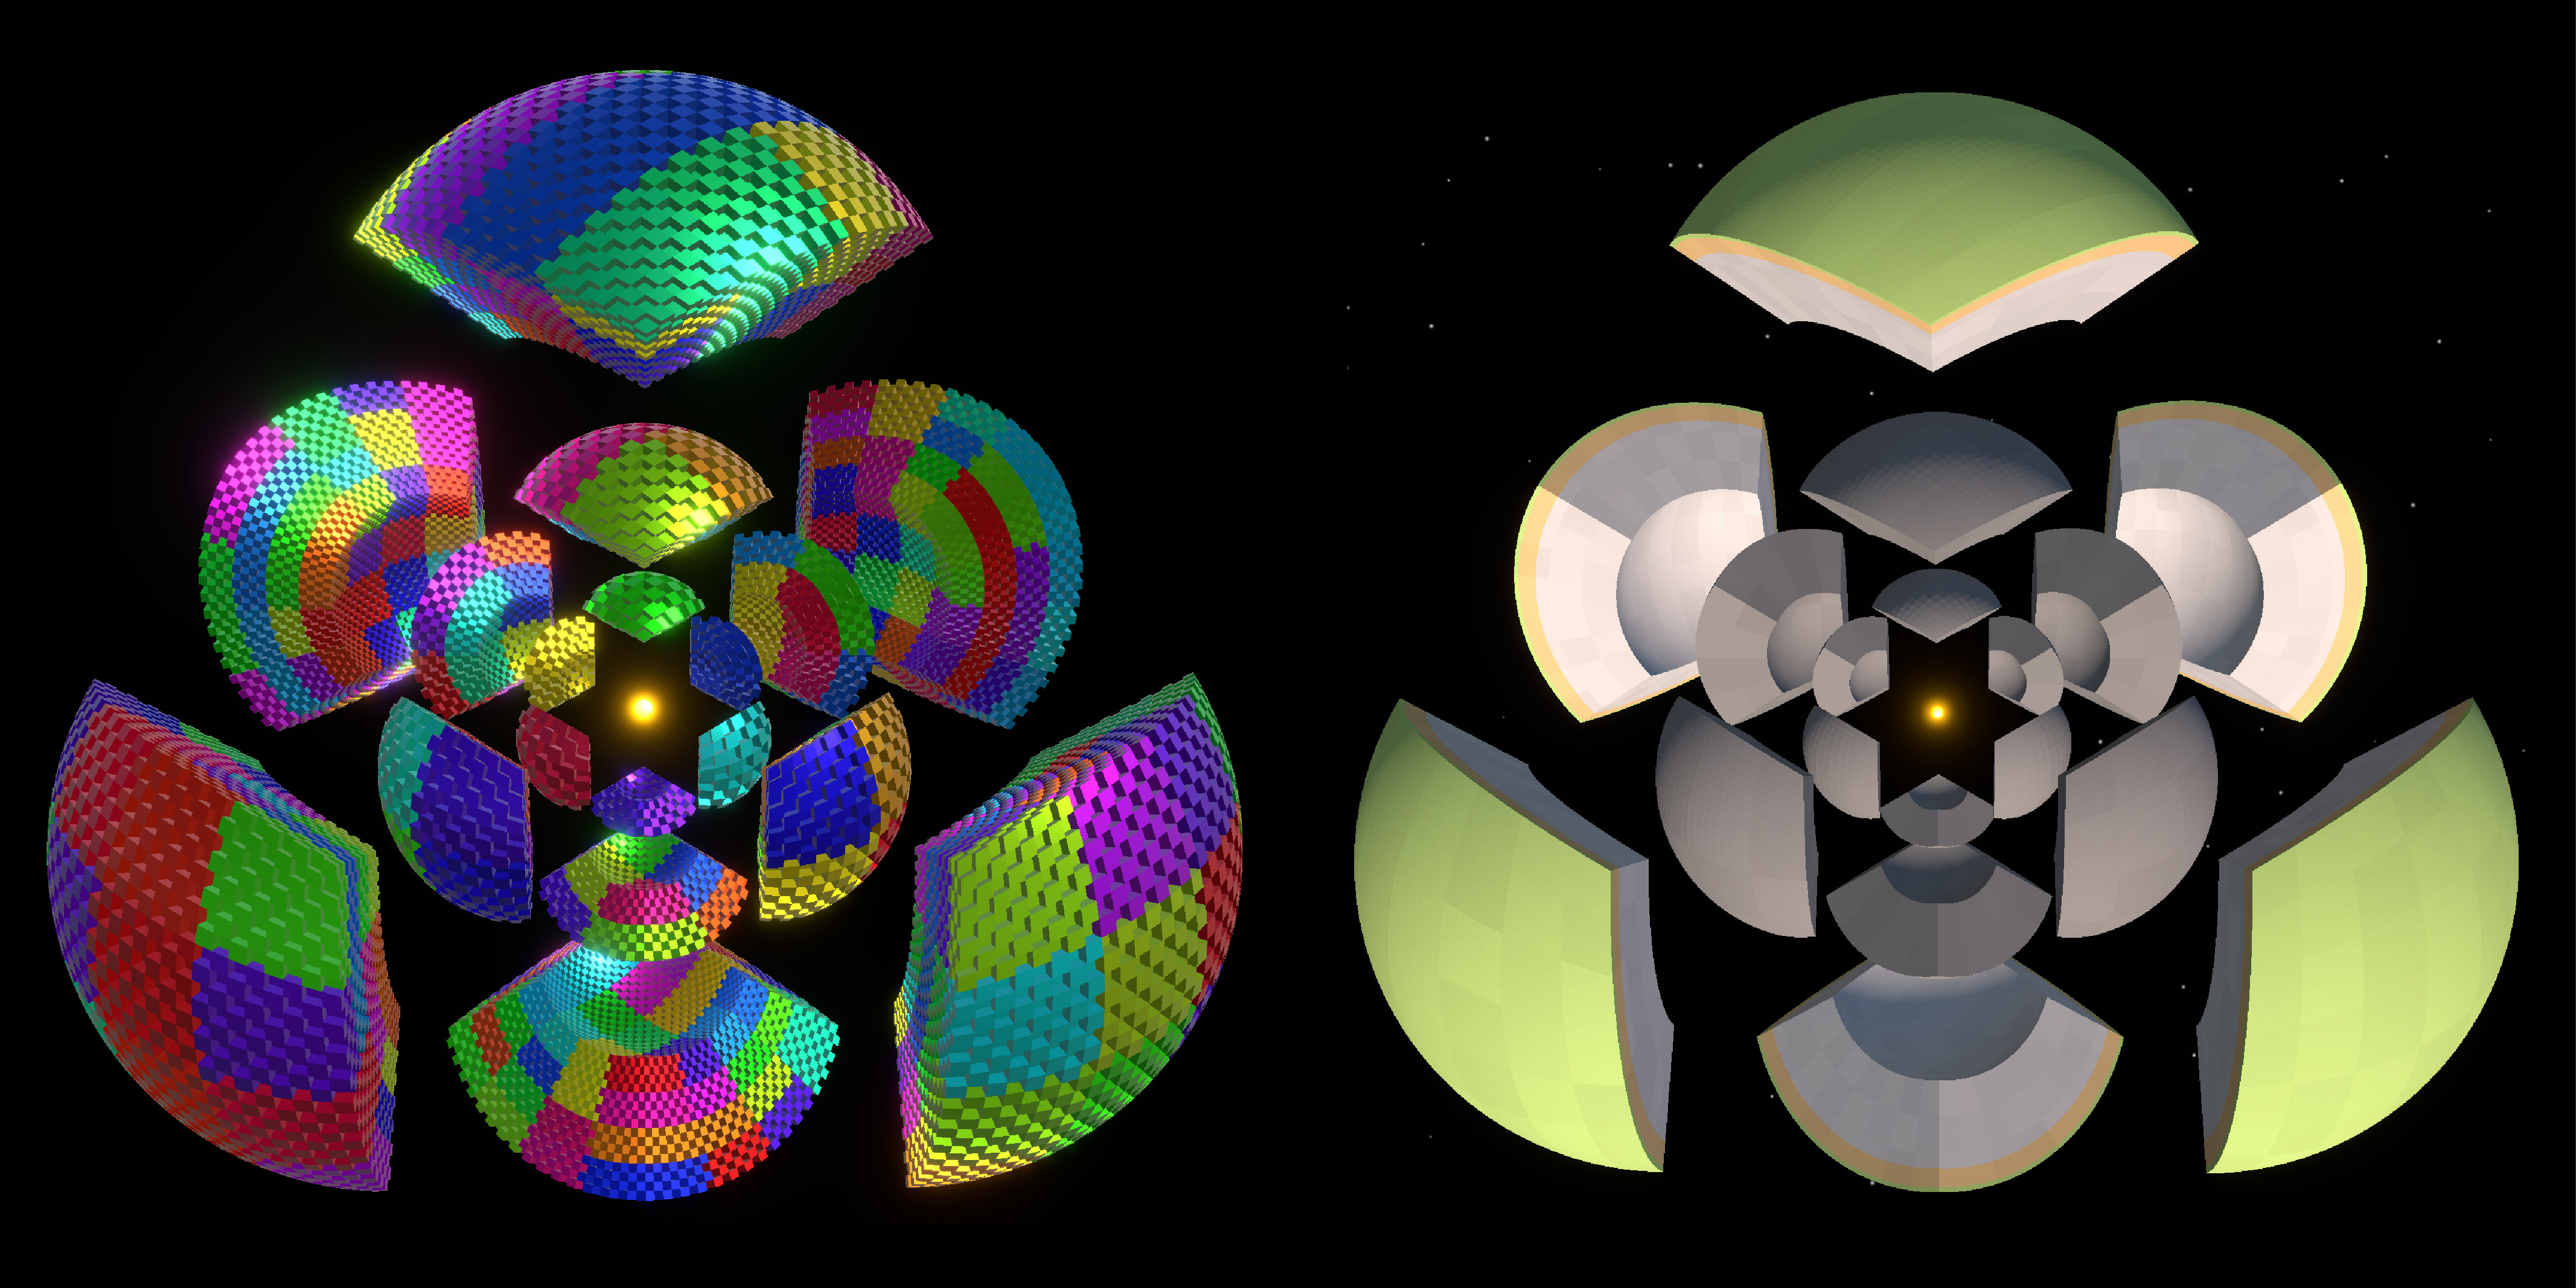
Screenshots showing a spherical planet “exploded” into its distinct sectors and shells with a glowing core.
Left: Randomly colored chunks with every other block missing. Right: Fully filled shells with more natural colors.
What’s my address?
For mechanics like placing blocks, we need to be able to take a world position and get the corresponding block address.
A block address specifies the exact location of a block’s data within the planet’s overall structure. It works much like a postal address that becomes increasingly precise, going from Country → State → City → Building. For a block address, the sequence is Sector → Shell → Chunk → Block.
If code is more your thing, here’s an example of how I represent this address as a C# struct:
struct BlockAddress
{
    public int sectorIndex; // 0 - 5
    public int shellIndex;  // 0 - +Infinity
    public int3 chunkIndex; // [0-n, 0-n, 0-n]
    public int3 blockIndex; // [0-15, 0-15, 0-15]
}
Finding the address from a world position requires a few steps that you probably don’t care about, so I’ll skip them for now. Oh, and in case you were wondering, this is all trivial to do on a flat blocky world.
Okay then, but I warned you…
Given a position relative to the planet’s center (i.e. vector from planet origin to world position), we calculate the address in the following ways:
Sector Index: Find the index of the coordinate with the maximum absolute value. This will give you the sector’s axis. You can then use the sign of the coordinate to get the actual sector. For example, the relative position (50, -30, -64) will have its sector along the z-axis since abs(-64) is the max value. Then the fact that it is negative tells you that it corresponds to the “Back” sector instead of the “Front” sector.
Shell Index: Find the distance of the position from the planet origin, then determine which shell this falls in. This is a little tricky since shells have different layer counts (i.e. heights), so I need to use a loop instead of just dividing the distance by some fixed height.
ChunkIndex: For the x and z indices, we perform a reverse projection to get the position on the cube face. We then normalize this projected position so each coordinate goes from -1 to 1. We then remap this to go from 0-(# of horizontal chunks in the current shell). For the y index, we inverse lerp the position’s radius between the shell’s min and max radii, then multiply the result by the # of vertical chunks in the shell.
BlockIndex: Do the same thing we did for the chunk index, except remap it to the # of blocks and then mod the chunk size.
Who’s my Neighbor?
A vital operation in any blocky game is the ability to efficiently find neighboring blocks. This is used for mechanics like placing/breaking multiple blocks at once, as well as optimizations like only drawing block faces that are visible to the player. As you can probably guess, finding neighboring blocks is trivial in a flat voxel world. However, I found solving this problem consistently to be the most challenging part of this project (and to be honest, I think I still missed an edge case).
Goal: Given an block address and one of six (6) axis directions, return the address of the neighboring block in that direction.
These axis directions correspond to the positive and negative directions of the 3D coordinate axes, which are: Left = -X, Right = +X, Down = -Y, Up = +Y, Back = -Z, and Front = +Z.

If the neighbor is within the same chunk, or even within the same shell, their address is fairly easy to find. However, it gets trickier when crossing shell boundaries.
Vertical Shell Boundaries
Vertical shell boundaries already break one of our assumptions — that a block only has a single neighbor in a given direction. How very inconvenient…
This comes from our attempt to minimize depth distortion by adding more blocks in successive shells. In my case, that means a block at the top of shell N will map to four (4) separate blocks at the bottom of shell N+1. The inverse is also true — those four (4) blocks will share a single downward neighbor.
This complicates the code a bit, but isn’t too difficult to account for. It just means some extra checks when handling vertical neighbors.

And in case you’re curious, here’s how these vertical shell boundaries look in-game:
Sector Boundaries
Sector boundaries are tricky because unlike neighboring chunks, we cannot assume the neighboring sector will share the same local alignment. For example, let’s consider the flat squares that corresponds to our six (6) sectors (think back to the quad sphere). Each square will have its own local 2D coordinate system, which I’ll refer to here using the variables u and v.

Six (6) sector squares with local (u, v) coordinate systems.
From left-to-right and top-to-bottom: Front, Up, Down, Left, Right, Back.
In order to assemble the planet surface from these squares, we have to glue their edges together. This results in twelve (12) edge pairings. Where things get difficult is that each pairing can be misaligned in one or both of the following ways:
- Axes are mismatched (a u axis glued to a v axis)
- Axes are flipped (pointed in opposite directions)

These misalignments are unavoidable, but can be accounted for by swapping/flipping indices. Though the matter of how each pairing is misaligned comes down to how you decide to glue everything together. This is an arbitrary decision, but it’s important to stay consistent once decided. The diagram below shows the cube net corresponding to my choices for how to glue the sides of my planet together.

Miscellaneous Functionality
Whew! That concludes the discussion of the more structural aspects of making a spherical blocky planet. Now the rest of this post will touch on a few other considerations regarding gravity and world generation.
Player Gravity
The player uses a fairly standard physics-driven controller that applies forces to a rigidbody to move around. However, in order to stop the player from just falling off the side of the planet, I disable the built-in downward gravity and apply my own custom gravity that accelerates the player towards the center of the planet.
While I do adjust the strength of gravity based on distance, it’s more vibes-based than physically accurate. I keep the gravity constant when above the surface terrain so the gameplay stays predictable. However as you dig towards the planet’s center the gravity decreases towards zero (0) to simulate the planet pulling on you equally in all directions.
I also added a “thruster” ability that can be triggered by holding SPACE while in the air. This applies an opposite force to counteract and overpower gravity, making it easy to get into orbit around the planet.

I rotate the player’s local up vector to be aligned with the negative direction of gravity (i.e. the ground is always “down”). If you try to do this yourself, I suggest smoothly interpolating the player’s rotation instead of snapping it each frame. I initially did the latter, which led to some stuttering and disorienting snapping near the planet origin.
Terrain Generation
Like most terrain generators, I use smooth noise to determine the terrain height. Once the height is known, the types for all the blocks can be calculated using the following steps:
- Set all blocks to empty (air) blocks
- If a block falls below the terrain height, set it to stone
- Convert blocks to grass or dirt depending on their distance from the top of their respective column
- If a block falls below the planetary water level, then make the following conversions:
- Grass → Sand
- Air → Water

The specifics of exactly how the terrain height is generated for all the columns is where spherical worlds differ from flat ones. Games with flat worlds (i.e. most of them) use 2D noise to generate a height map. You can then just look up a column’s corresponding height using its (x,z) coordinates.
There are two (2) issues that make this challenging to apply to a spherical world:
- The noise values need to smoothly tile across the sphere (i.e. produce no visible seams)
- Mapping 2D noise to the sphere will introduce some distortion (see first half of this post)
Luckily, there’s a far easier solution — sample a 3D noise function on a sphere. This solves both the tiling problem (since there are no seams) and the distortion problem (since we’re not converting from 2D to 3D). We can sample the unit sphere by default, but we are free to sample spheres with a different radii to create noise at different scales (for different planet sizes). In addition, we can translate the sphere in our noise space to implement random seeds.
This type of noise could also be used for a biome system like in the real Minecraft, however for now I use a simpler approach. My planets only have two (2) biomes — forest and arctic. To determine if a given block column is in the arctic biome, I look at its angular distance to either pole (North and South). If this falls below some threshold angle, it’s considered to be arctic, otherwise it’s forest. I also add some smooth noise to this threshold to prevent a perfect circular border between these two (2) biomes.
Block Structures
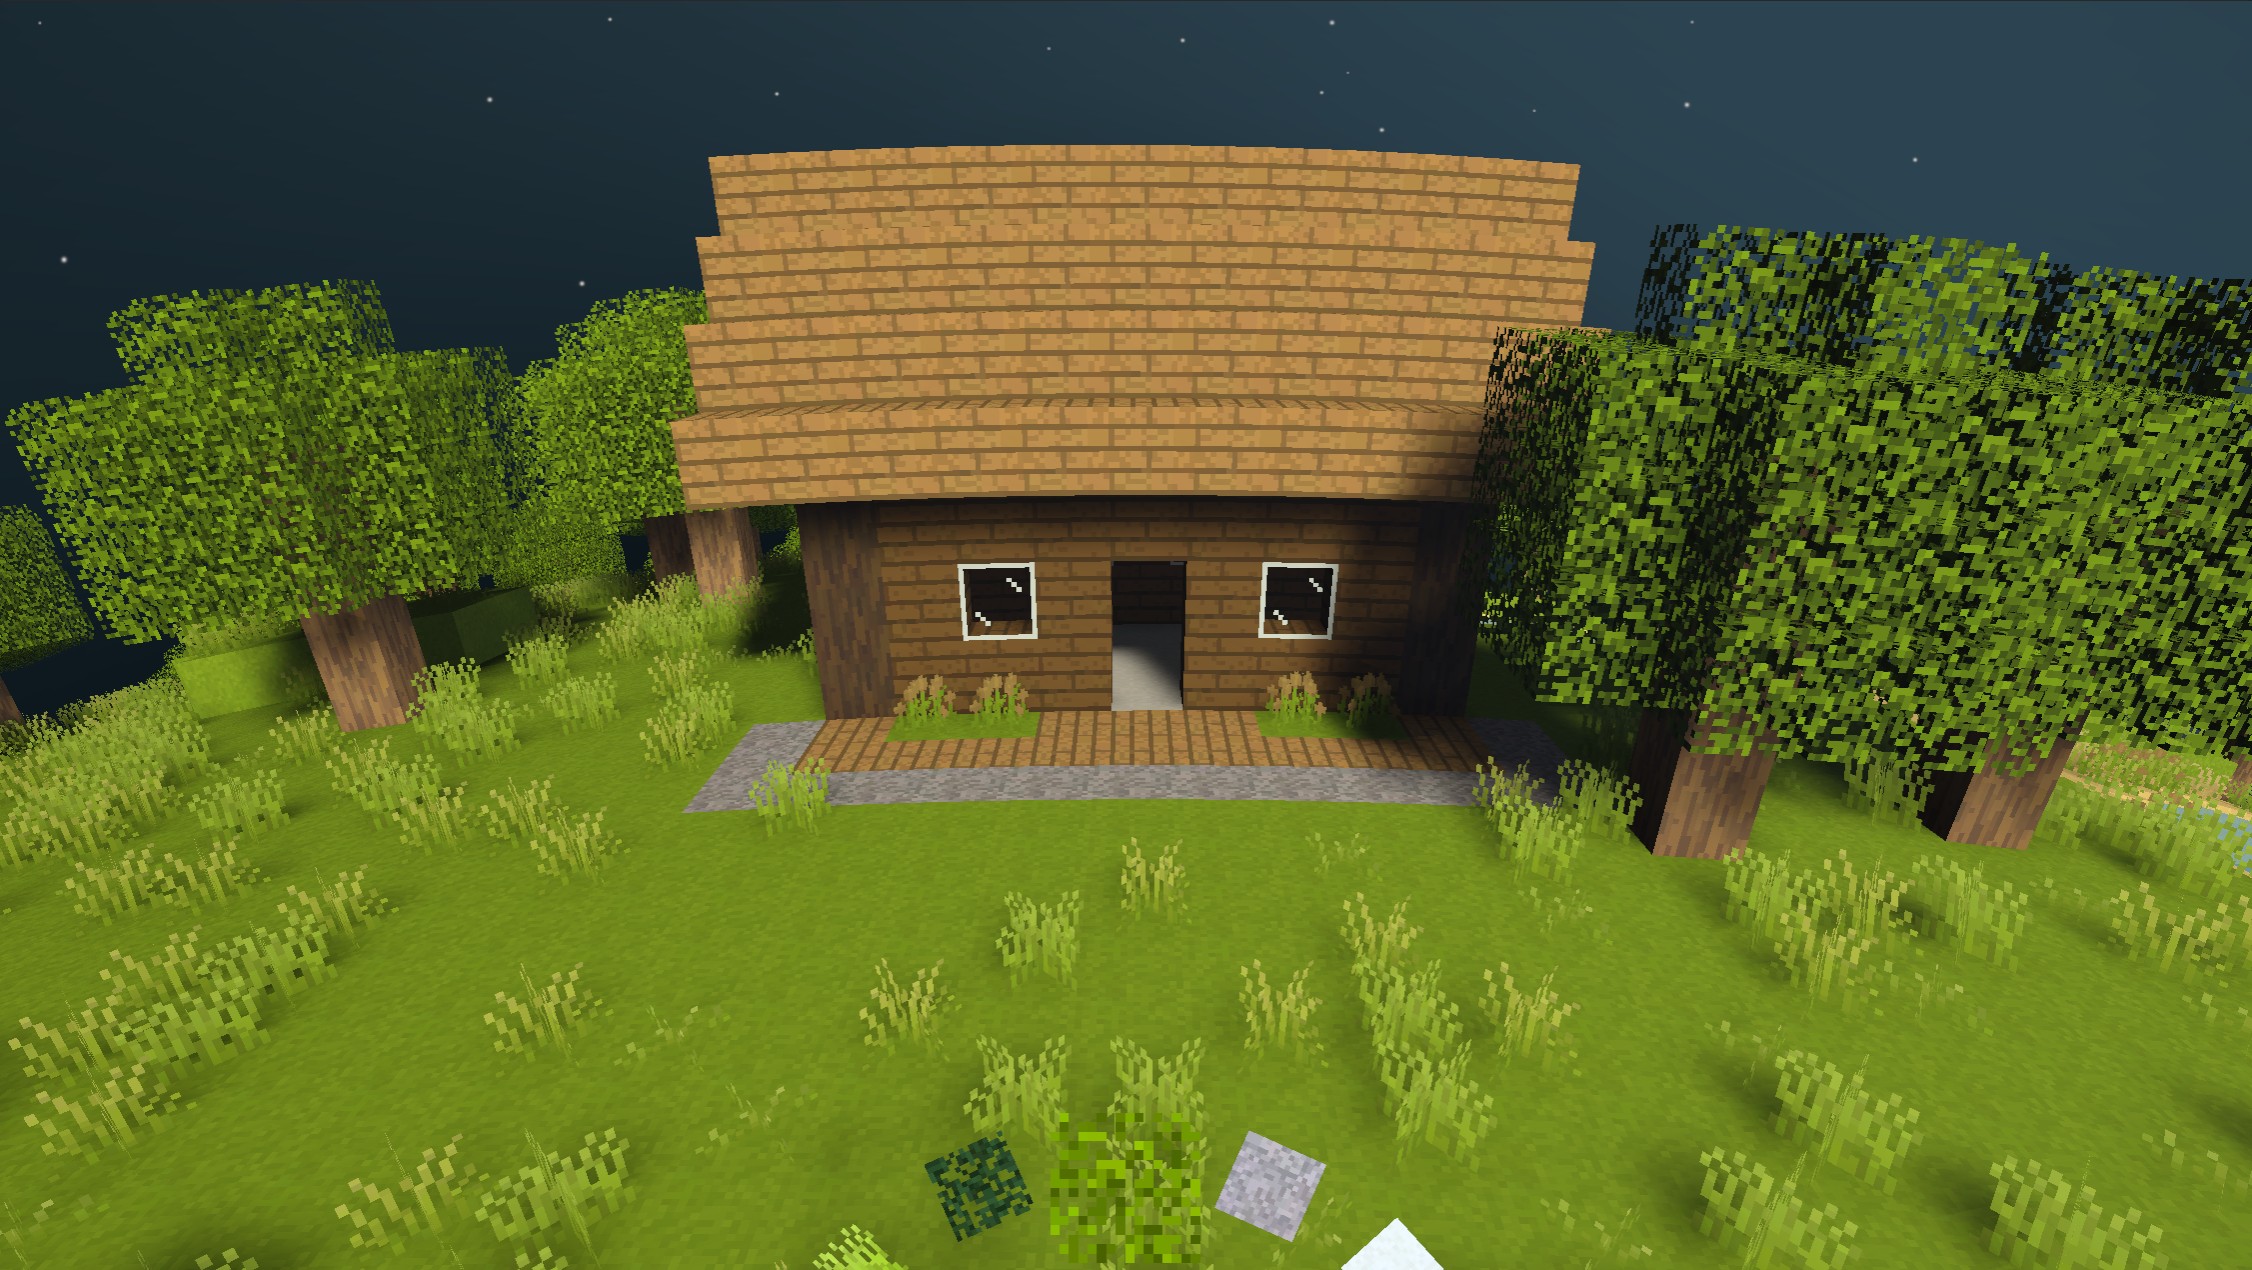
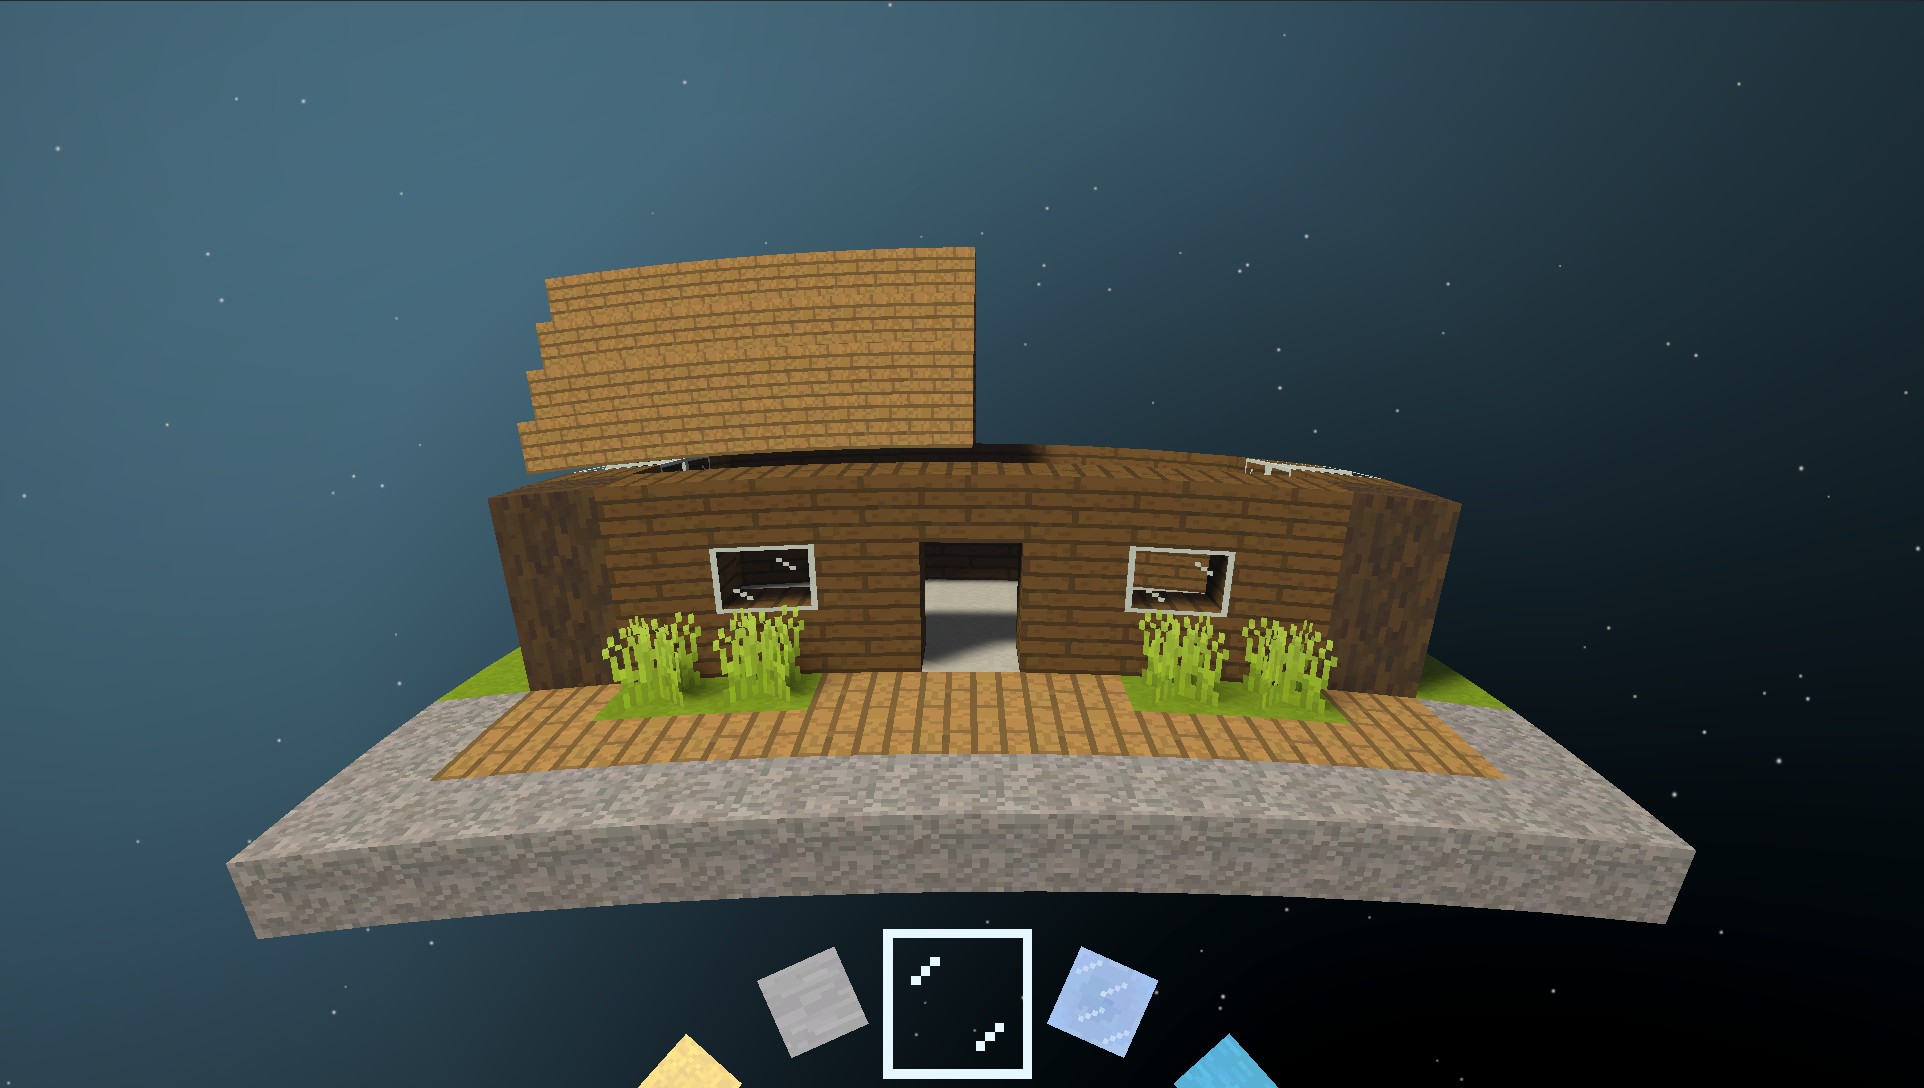
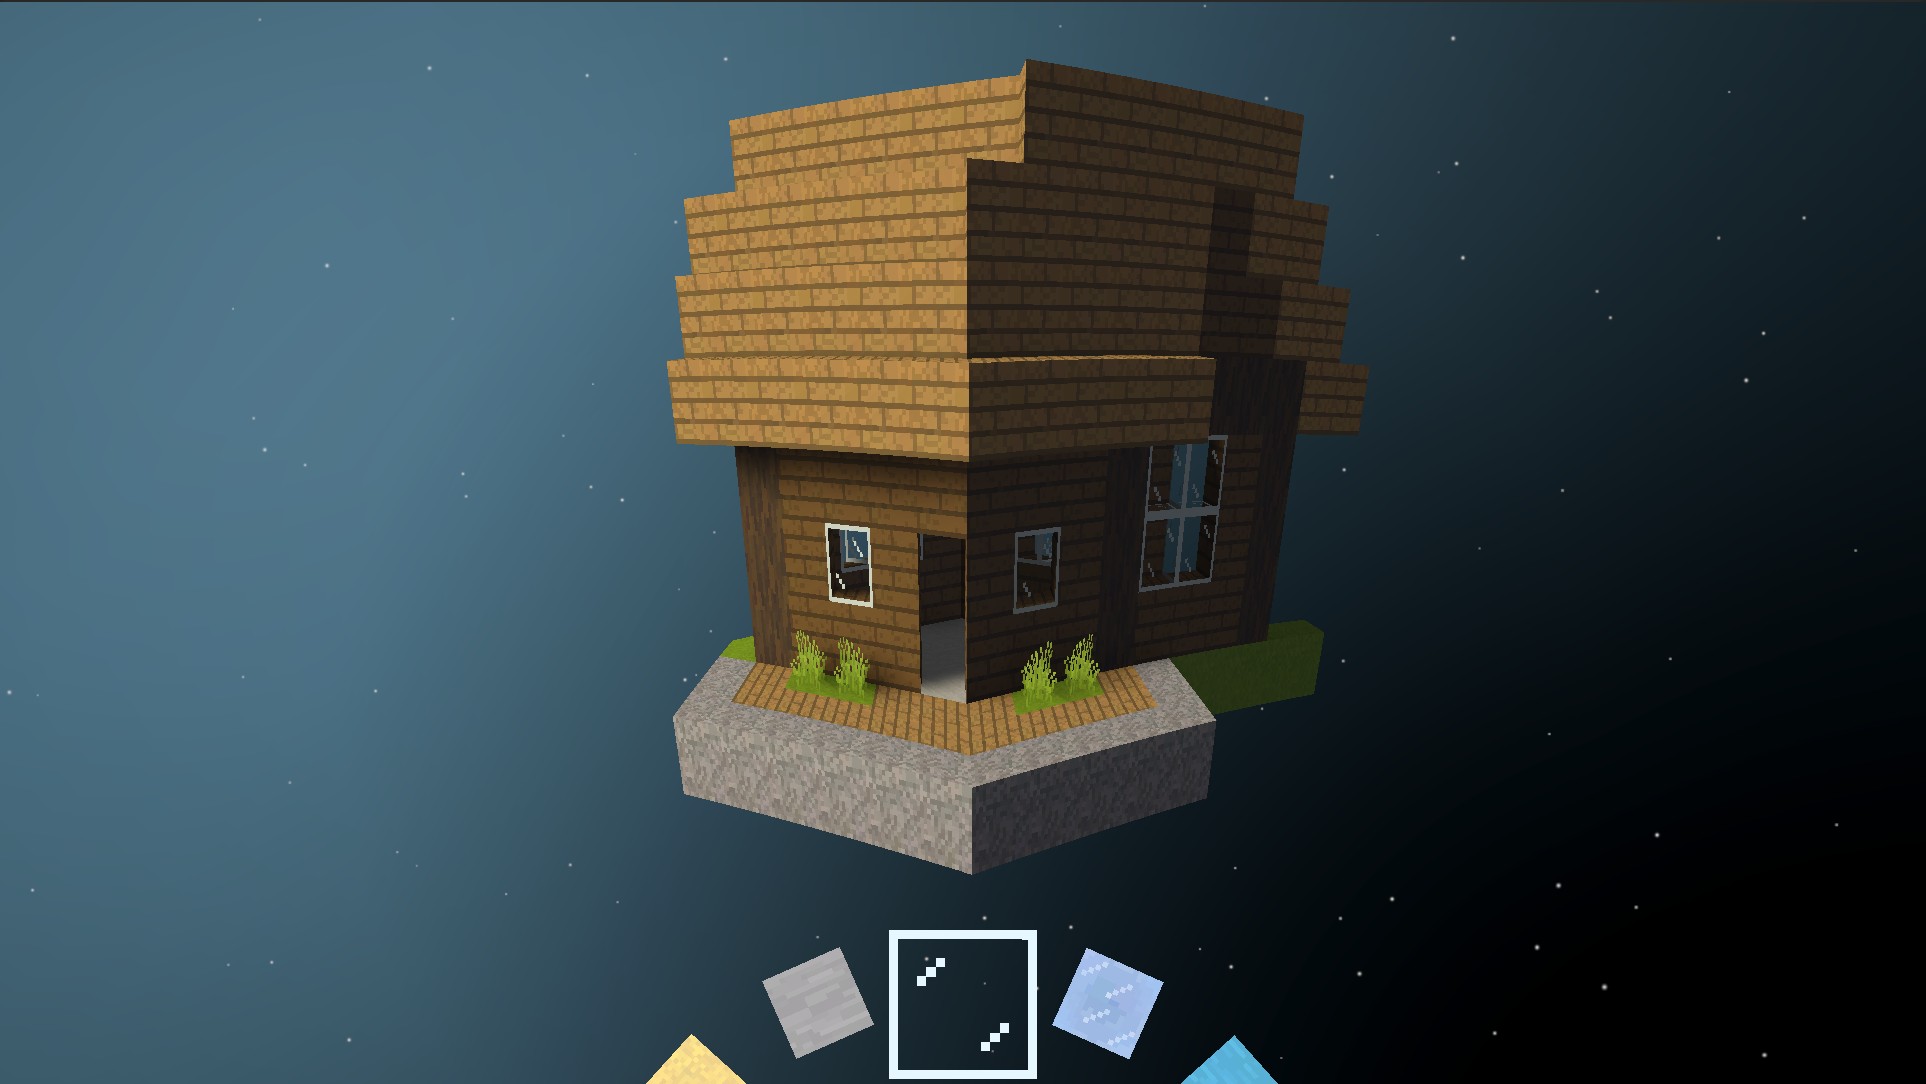
I consider block structures to be any saved arrangement of blocks that can be pasted into the world. This includes natural structures like trees that get placed during world generation, as well as saved player-built structures like this house below.
These structures are saved as 3D arrays of blocks (referred to below as the source zone). In theory placing them should be as straightforward as:
- Determining the destination zone on the planet where the structure should be placed
- Copying each block from the source zone to its corresponding position in the destination zone

But as we’ve seen many times now, nothing is ever easy on a spherical blocky world.
When it comes to placing block structures, there are two (2) edge cases that can throw a wrench into things:
- The corners where three (3) sectors meet break the regular horizontal grid topology, since three (3) blocks meet at the corner instead of four (4)
- Vertical shell boundaries break the regular vertical grid topology, since a block can have four (4) vertical neighbors instead of just one (1)
This means that there are places on our planet where it’s impossible to define a box-shaped zone of blocks that corresponds to the block structure’s source zone. I could just detect and prevent structures from being placed at these locations, but I opted for a more general solution.
Instead of viewing the block structure as a single box being placed at once, I interpret it as placing an origin block that I then build out from to create the structure. This results in each block having its own series of directions from the origin block to its relative address. We can then leverage the previous work we did for finding neighboring block addresses to navigate using these directions.

Placing structures will now “work” everywhere, though it can get a little wonky around the problematic areas. Still, I prefer this to having dead zones where no structures can be placed at all.
Future Work
I’m not sure how much time I’ll spend on Blocky Planet going forward. Nevertheless, I already have a long backlog of features I’d like to implement. Some have already been mentioned earlier in this post, but I’ll repeat them here for clarity.
Multiple Planets/Moons: Since starting this project I’ve envisioned an Outer Wilds style solar system filled with blocky planets that the player can navigate between. These planets could follow a simple clockwork style movement, or use a more advanced gravity simulation (ex. Sebastian Lague’s solar system project).
Chunk-Based Gravity: Gravity should be calculated dynamically per chunk based on the blocks in said chunk. This should be doable with little to no performance hit, and would result in more “realistic” gravity when inside a planet.
Planet Collisions: Assuming multiple planet’s are implemented, I’d like to support some form of collision between them (ex. blocky asteroids crashing into planets). However, just thinking about implementing this gives me a headache, so I wouldn’t expect it in the near future (if ever).
Cave Generation: As fun as walking on the planet is, I think exploring caves leading from the surface to the planet’s core would be even better.
Proper Biomes: Procedural generation on a planet allows for more realistic biome generation, since you can take into account factors like distance to the equator.
Voxel-Based Lighting: I currently use Unity’s direct lighting and shadowing system for the planet. This works well enough, though to get better global illumination I’d like to combine this direct lighting with a proper voxel-based lighting system (similar to actual Minecraft).
If there’s any features you would like me to implement, or if you have any feedback in general, feel free to leave a comment on the Reddit post here.